Code
!ffmpeg -i Test.m4a Test.wav -v quiet -yIn this post I will look into some filters for audio processing in ffmpeg, sox, and Python. I have recorded a small 6 second audio clip where for the first couple of seconds I was not speaking, but background noise is present.
I had recorded the audio on my Apple device and it was default recorded in .m4a format. I convert it to the wav format. I use ffmpeg for the same. In addition, I am using two flags: -v quiet to reduce the amount of information printed on the console. Second, I am using -y to overwrite an existing file with the same name.
!ffmpeg -i Test.m4a Test.wav -v quiet -yfrom IPython.display import Audio
import matplotlib.pyplot as plt
%matplotlib inlineAudio("Test.wav")!ffmpeg -i Test.wav -lavfi showspectrumpic=s=720x540:color='magma' ../images/input-spectogram.png -y -v quiet
As can be seen in the above image, I am speaking somewhere close to 3.70 seconds onwards. However, the audio is pretty noisy before this even though I am not speaking. This is due to the background noise coming in from the fans and the air conditioning system.
!sox Test.wav -n spectrogram -o ../images/sox-sg.png
!sox Test.wav -n rate 32k spectrogram -o ../images/sox-sg-trimmed.png 
I’ll now get some attributes of the post that are required for processing, such as the recording rate. ## Getting attributes of the recorded file
!ffmpeg -i Test.wavffmpeg version 4.4 Copyright (c) 2000-2021 the FFmpeg developers built with Apple clang version 12.0.5 (clang-1205.0.22.9) configuration: --prefix=/usr/local/Cellar/ffmpeg/4.4_2 --enable-shared --enable-pthreads --enable-version3 --cc=clang --host-cflags= --host-ldflags= --enable-ffplay --enable-gnutls --enable-gpl --enable-libaom --enable-libbluray --enable-libdav1d --enable-libmp3lame --enable-libopus --enable-librav1e --enable-librubberband --enable-libsnappy --enable-libsrt --enable-libtesseract --enable-libtheora --enable-libvidstab --enable-libvorbis --enable-libvpx --enable-libwebp --enable-libx264 --enable-libx265 --enable-libxml2 --enable-libxvid --enable-lzma --enable-libfontconfig --enable-libfreetype --enable-frei0r --enable-libass --enable-libopencore-amrnb --enable-libopencore-amrwb --enable-libopenjpeg --enable-libspeex --enable-libsoxr --enable-libzmq --enable-libzimg --disable-libjack --disable-indev=jack --enable-avresample --enable-videotoolbox libavutil 56. 70.100 / 56. 70.100 libavcodec 58.134.100 / 58.134.100 libavformat 58. 76.100 / 58. 76.100 libavdevice 58. 13.100 / 58. 13.100 libavfilter 7.110.100 / 7.110.100 libavresample 4. 0. 0 / 4. 0. 0 libswscale 5. 9.100 / 5. 9.100 libswresample 3. 9.100 / 3. 9.100 libpostproc 55. 9.100 / 55. 9.100 Guessed Channel Layout for Input Stream #0.0 : mono Input #0, wav, from 'Test.wav': Metadata: title : Test encoder : Lavf58.76.100 Duration: 00:00:06.63, bitrate: 768 kb/s Stream #0:0: Audio: pcm_s16le ([1][0][0][0] / 0x0001), 48000 Hz, mono, s16, 768 kb/s At least one output file must be specified
As can be seen from the cell above, the recording rate is 48 kHz. We will need this when we do some processing in Python.
Building a noise profile from first 3 second
!ffmpeg -i Test.wav -ss 0 -to 3.5 -c copy Noise-Test.wav -v quiet -yAudio('Noise-Test.wav')!sox Noise-Test.wav -n rate 32k spectrogram -o ../images/sox-noise.png 
!sox Noise-Test.wav -n noiseprof noise.prof!sox Noise-Test.wav Noise-Test-cleaned.wav noisered noise.prof 0.21Audio("Noise-Test-cleaned.wav")!sox Test.wav Test-cleaned-05.wav noisered noise.prof 0.05
!sox Test.wav Test-cleaned-18.wav noisered noise.prof 0.18
!sox Test.wav Test-cleaned-21.wav noisered noise.prof 0.21Audio("Test-cleaned-05.wav")Audio("Test-cleaned-18.wav")Audio("Test-cleaned-21.wav")!sox Test-cleaned-21.wav -n rate 32k spectrogram -o ../images/sox-cleaned-21.png 
!sox Test-cleaned-05.wav -n rate 32k spectrogram -o ../images/sox-cleaned-05.png 
Audio("Test-audacity.wav")!sox Test-audacity.wav -n rate 32k spectrogram -o ../images/sg-audacity.png 
!ffmpeg -i Test.wav -filter:a "highpass=f=300" high-passed.wav -y -v quiet
Audio("high-passed.wav")!sox high-passed.wav -n rate 32k spectrogram -o ../images/highpass.png 
Audio("test-imovie.wav")!sox test-imovie.wav -n remix 1 rate 32k spectrogram -o ../images/imovie.png import mediapy
orig = mediapy.read_image('../images/sox-sg-trimmed.png')
audacity = mediapy.read_image('../images/sg-audacity.png')
sox_21 = mediapy.read_image('../images/sox-cleaned-21.png')
sox_05 = mediapy.read_image('../images/sox-cleaned-05.png')
high_pass_300 = mediapy.read_image('../images/highpass.png')
imovie = mediapy.read_image('../images/imovie.png')
mediapy.show_images({'Original':orig,
'Audacity':audacity,
'Sox:0.21':sox_21,
'Sox:0.05':sox_05,
'HPF:300': high_pass_300,
'imovie':imovie},
cmap='magma', columns=4, height=200 )
Original

|
Audacity

|
Sox:0.21

|
Sox:0.05

|
HPF:300

|
imovie

|
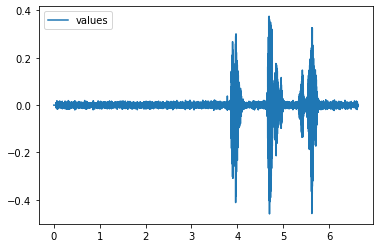
!sox test-audacity.wav output.datimport pandas as pd
df = pd.read_csv("output.dat", skiprows=2, index_col=0, names=['values'],delim_whitespace=True)
df = df.astype('float64')df.plot()